In a body full of various joints, the hinge joints occupy unique real estate: your arms, legs, fingers, and toes, all of the parts of the body that directly interact with the environment.
However, a hinge exercise doesn’t exercise your hinge joints. It trains your hip—which is not a hinge joint. The word “hinge” refers to the movement pattern, where your body bends around the hips, like a door moving around its hinges. So you have hinge joints and hinge exercises, which aren’t necessarily the same thing. Clear as mud, right?
Exercising the specific hinge joints would have been an easier route for this series of exercises, and it could have focused more on the elbow and knee joints, the body’s large, dedicated hinge joints. Instead, having spent the last several weeks working alongside the department physical therapists to restore proper hip mobility and functional capability to a surprisingly large group of patients, I decided to go right for the hips. That is, your hips.
But let’s look at all the joints first.
There are three main types of joints in your body: some that don’t move very much at all and others that do.
-
Immovable Joints: These joints are characterized by two or more bones in close contact that do not move. A great example is the skull, where the movable bony sections—joined together by flexible tissue at birth—allow the skull to flex as it passes through the birth canal and eventually fuse into a single, rigid whole. In adults, you can still see the “suture” lines of the joints.
-
Slightly Movable Joints: These are also known as the “cartilaginous” joints because they comprise a layer of cartilage between the bones. Your spinal vertebrae serve as excellent examples here, because though your spine is collectively capable of a vast range of movement, the individual joints themselves don’t move much. The joints between your ribs and your sternum are also good examples. They are movable, but only to a limited extent.
-
Freely Movable Joints: Now we’re talking! These are the most common type of joints in your body. Also known as “synovial” joints, they are encapsulated in tissue and use synovial fluid to ensure smooth movement.
Included among the movable joints are the hinge joints. These joints move freely, but only back and forth in one plane. These joints have very defined movement patterns and can handle large amounts of force.
Your hip joint is a ball-and-socket joint, and it moves in many directions. However, exercises that place the hip joints into hinging movements like strict hip flexion and extension while also including the rest of the body can strengthen the whole posterior chain, including your glutes, hamstrings, and even your lower back-while also teaching the body to bend safely.
5 Effective Hinging Exercises
The following exercises stay close to classic physical hinge movements in which the back remains more or less straight, and the hips, glutes, abs, and core muscles get a great workout.
These are all highly controllable, low-impact exercises, but I suggest that you speak with your medical provider to ensure they are right for you.
1. Broomstick Good Morning
Mornings can greet you with more than sunshine—resplendent with stiff joints and muscles, chief among them perhaps being in the lower back. To help sweep those aches and pains away is the Broomstick Good Morning exercise.
Step 1: Stand with your feet approximately hip-width apart. Place a broom or dowel stick across your shoulders horizontally and hold on to it with both hands.
Step 2: Keeping your back and legs straight, carefully hinge forward at your hips and slowly bend forward as far as you comfortably can.
Step 3: Once you bend as far as you comfortably can, slowly return upright. Be sure to use your core strength, rather than your back muscles, to rise. Bending over and then straightening back up counts as one repetition. Try to perform three sets of 12 repetitions.
Modifications: If you can’t get the stick comfortably behind your neck, hold it in front of your neck instead. Avoid aggravating your back by only bending forward as far as you comfortably can.
Why I Like Them: “Don’t let the sun rise on a tight back.” This sage advice was given to me more than 30 years ago by a patient, and it’s still great advice today. Broomstick Good Mornings directly and gently address tight lower back muscles and joints, helping you avoid low back pain as your day gets underway.
2. Seated Leg Lifts
Seated Leg Lifts fall into the category of “anytime, anywhere” exercises that I love so much. The hinging motion here is at the hips, of course, which strongly engages the hip flexor muscles and also gives a lot of love to the rectus femoris—one of the quadriceps muscles of the leg—and your core musculature as well.
Step 1: Sit on the front edge of a sturdy chair or bench with your feet on the floor.
Step 2: Slowly bring your knees as high up to your chest as you comfortably can. From here, push your feet straight out in front of you as far as you comfortably can, preferably until your legs are straight out in front of you and your knees are straight. Then draw your knees back up to your chest. Keep your core engaged and your back straight throughout.
Step 3: Pulling your legs to your chest counts as one repetition. Perform three sets of 12 repetitions.
Modifications: If you are just building your core strength, or it isn’t yet very strong, feel free to use a chair back for support—sit on the front of a chair with a sturdy back—you can either lean against it the whole time, or just know it’s there to catch you if you need it.
Only move your legs as far up as you comfortably can. If you can’t move them very far, just do the best you can at first. Use your hands to help stabilize yourself on the chair or bench as needed.
Why I Like Them: Hip flexion helps get your foot off the floor when walking, and having strong hip flexors can play a significant role in quality of life in two ways. First, it imparts a great feeling of “lightness” when walking, which can make you feel better. Second, it can help you avoid toe catches from inadequate foot lifting when walking, which can keep you from tripping and falling—which is always nice.
3. V-ups
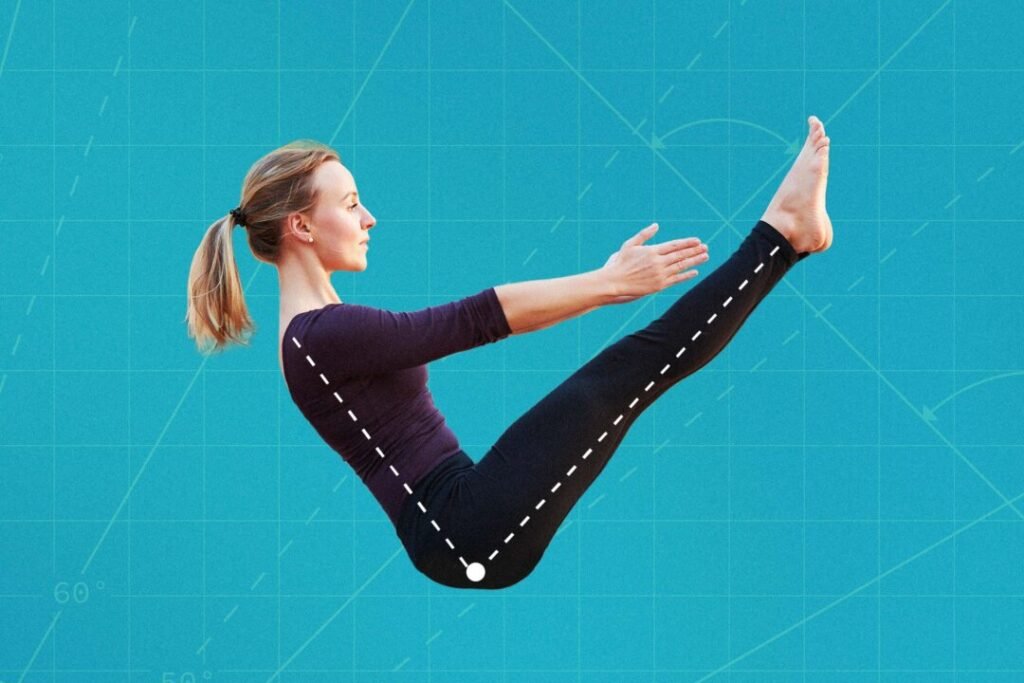
Granted, this exercise may look a little difficult—even impossible—to some of you, but I encourage you to try it. Many people are surprised at how well they can do this exercise. The V-up hinges at the hip and heavily engages the anterior muscular chain (the muscles along the front of your body), including your entire core.
Step 1: Lie on your back on a firm, supportive surface with your body straight and your arms extended overhead.
Step 2: Lift your arms and legs off the floor and, keeping your legs straight, reach toward your feet with your hands while balancing on your bottom before returning to the starting position. It’s natural for the body to rock a bit as it seeks to stabilize in the balanced position.
Step 3: Moving up and reaching toward your feet counts as one repetition. Try to perform three sets of 12 repetitions.
Note: If you own dogs, please understand that this exercise often looks like playtime to them—so prepare for the doggie zoomies. They won’t understand exactly what you’re doing, but they’ll definitely want to be part of it.
Modifications: Only come up as far as you can if you can’t rise all the way. In the most basic form, try to get your shoulders and legs off the ground if nothing else, which will engage every muscle you’d use in the full exercise. As the saying goes, you have to start somewhere, and that’s a great place to start.
Why I Like Them: I really like the V-up exercise due to its hidden muscle-balancing requirements. You have to coordinate the combined contractions of muscles from your shoulders down through your legs, which teaches your body to work with itself during coordinated postural movements. Mastering coordinated postural movements can give you a feeling of wholeness and control during movement.
Related Stories
4. Seated Hip Hinge
We started this exercise set with the Broomstick Good Morning exercise, which focuses on the back musculature in a standing hip-hinging movement right after you get out of bed. Now that we’ve warmed up with a few exercises, we’re going to turn it up a bit with a seated hip hinge, which allows us to move more deeply into a much more focused hip hinge.
Step 1: Sit at the front of a chair or bench with your legs separated as far as you comfortably can.
Step 2: Place a broomstick or dowel horizontally on your back behind your shoulders and hold it with both hands.
Step 3: Slowly hinge forward at the hips, like a closing door, until you reach approximately 90 degrees of hip flexion while keeping your back straight and the bar level. From here, use your core muscles to return to an upright position.
Step 4: Hinging forward and returning to an upright sitting position counts as one repetition. Try to perform three sets of 12 repetitions.
Modifications: Because this exercise focuses so precisely on low back flexion, only move as deeply into the movement as you comfortably can. Just go until you feel a nice stretch in your lower back and/or hamstrings, then return upright from there. Don’t worry if you can’t move far; let your body tell you how much movement is OK.
Why I Like Them: The seated hip hinge delivers fantastic stability as you move through the range of motion. I also like that it often addresses the 800-pound gorilla in the room called lower back pain. Instead of altering our lives to accommodate weak, painful backs, we can use this exercise to carefully strengthen our backs and use them with less pain.
5. Seated Hip Thrust
The seated hip thrust starts with a hinged hip and moves into hip extension as you push your hips off the floor with your glutes and hamstrings, supported by the core musculature of the trunk and the erector spinae muscles of the back.
Step 1: Sit on the floor with your back against a chair seat, couch, bed, or bench with your feet flat on the floor in front of you and your arms back on the surface for support.
Step 2: Keeping your back straight, push through your feet and lift your hips off the floor until your trunk is in a straight line from your shoulders to your knees. Use the seating surface to support your shoulders. Hold for approximately three seconds before returning to the starting position.
Step 3: Pushing up, holding, and then lowering back down counts as one repetition. Try to perform three sets of 12 repetitions.
Modifications: Can’t rise all the way up? Rise as far as you can, and if you can’t hold the bridge portion of the exercise very long, just hold it as long as you can.
Why I Like Them: As with the Seated Hip Hinge, the Seated Hip Thrust allows you to perform the movement from a highly stable position while very specifically focusing on the involved muscles. I especially like the way this exercise targets your erector spinae muscles, which can become quite weak in this modern era of bad posture. Strong erector spinae muscles affirmatively contribute to upright posture.
These hinging exercises can help improve your posture and movement control as you go about your day. They are a great set for maximizing your core musculature and the muscles that control and contribute to hip flexion, but you have to be consistent with them to reap the maximum benefit.
I suggest performing them at least three times per week, and optimally five times. The general trend is that you will feel weak and have decreased control at first, with a much deeper, broader sense of postural control as you strengthen up, so give them time to work. I hope they benefit you and wish you good luck.
About the Fitness Model: Aerowenn Hunter is a health editor for The Epoch Times. She’s an accredited yoga therapist with more than three decades of teaching experience.